Feeds:
Posts
Comments

Archive for the ‘Easy’ Category

flower on stone“We have come into this exquisite world to experience ever and ever more deeply our divine courage, freedom and light!” — Hafiz

What a perfect quote to embody New Year. Persian New Year, that is, aka  Nowruz!

To me, it just feels right and natural to have a new year start with the promise, rebirth, and blossoming of spring.

Spring is a reminder of the inner light within each and every one of us. That’s worth celebrating!

Persian Card_New_YearsScroll down below for a roundup of highly celebratory (and symbolic) recipes from fellow Persian food bloggers. 

Thanks to the fabulous Sanam, of My Persian Kitchen, for putting this together!

Oh, technically the big day of the Persian New Year is always the spring equinox, which falls on Thursday, March 20, this year. Now’s as good a time as any to spread the happiness and to prepare for a fresh new season.

At the moment, I’m in a bit of Spring Cleaning Mode. (Oooof, those closets needed every ounce of attention I gave them last weekend. Ha!) I’m also prepping to host another yoga retreat, in upstate New York/in the Hudson Valley area.  March 14-16—perfect timing to get us ready for spring.

Looks like 2014 is a year of new beginnings for me in many ways. I’m headed to India at the end of the month. This trip has been a dream of mine for many years. At just the right time,  the stars aligned, the Universe and those I love are shining their support and approval on me, and I’m flying off on the night of the new moon. It’s happening!

As for Spring Cooking:

This is a classic clip for my (somewhat limited) TV archives. Here I am cooking kuku sabzi on live TV for Nowruz. This was on Good Day New York a.k.a Fox 5 a few years back:

More blogger Persian New Year goodness:

Read Full Post »

 
Double Chocolate Chunk Cookies are fudgey, brownie and cookie-like all at once. You'd never believe they're free of many common allergens, including gluten, dairy, and can easily be made minus eggs and tree nuts.

Double Chocolate Chunk Cookies are fudgey, brownie and cookie-like all at once. You’d never believe they’re free of many common allergens, including gluten, dairy, and can easily be made free of eggs and tree nuts. Cookie photos by Kristen Joerger of tiny-gourmet.com  .

This Double Chocolate Chunk Cookie recipe post has literally been years in the making.  A couple of years ago, I ran across a cookie recipe I really liked, and tinkered with it.  Soon, I was baking these babies up, and taking them to house parties, to weekends away, on hikes, and on road trips. People LOVE these cookies. I’ve heard people go so far as to call them “The best cookies I’ve ever had in my life.”

cookiesI’d bet money they’ve gotten me invited back a few places 😉

They were a huge hit at my most recent yoga retreat.

People always request this recipe, yet I always got sidetracked.

You’d never guess these cookies are free of many common allergens. My goal was to make them taste chocolately and decadent, not diet. These cookies have no:

  • gluten
  • dairy
  • egg (if you choose to veganize them, that is)
  • or tree nuts (if you choose the tree nut free option, that is)

Here are some of us at my most recent yoga retreat in upstate New York:

fall retreat group shot 2013 upstate

This magic batter traveled with me to my most recent yoga retreat, and the cookies were a huge hit when we packed them into the bagged picnic lunches we took with us to the apple orchard.

These cookies are packed with flavor and a beautiful texture.

Bria’s Double Chocolate Chunk Cookies.

Yield: About 2 dozen cookies.

  • 1 cup peanut butter (or almond butter, or, to go tree nut free, use sunflower seed butter.)
  • 1 cup UNSweetened cocoa powder
  • 1 cup of brown sugar (I prefer dark brown)
  • 1 egg (replace egg by combining 1 tbsp ground flax seeds + 3 tbsp warm water in a small bowl and stirring.  Allow a “jelly” to form after a few minutes and use this as your “egg”)
  • pinch teaspoon salt (leave out if your peanut butter is salted)
  • 2 teaspoons vanilla extract
  • 1 cup chocolate chips, chunks, or half a cup of each (I used Trader Joe’s brand, as they are free of dairy)

1.Preheat oven to 350 degrees F.

2. In a nice, roomy mixing bowl, cream together peanut butter, brown sugar, egg, and vanilla.

3. Begin adding in cocoa powder, 1/4 cup at a time, and mix until well incorporated and moist. If the batter gets too dry, add in bit of water, leftover coffee, or milk of choice to loosen it. Then remix. If batter becomes too loose, add in more cocoa powder to tighten it up.

4. Fold in 3/4 of the chocolate chips and/or chunks. Save the rest for garnish.

5. OPTIONAL/not always necessary: Stash mix in the freezer for 10-15 minutes while you prepare  your cookies sheets. I either line mine with parchment paper, or spray them with cooking spray. One of these days I WILL get a Silpat.

6. Use a cookie scoop or a spoon to make uniform sized dough balls. (I do this by hand and spoon, and each cookie is a generous tablespoon of dough). Do NOT smash cookies down.

7. Place 3-5 chocolate chips and/or chunks on the top of the cookies. You can flip the cookie dough ball upside down and get the chips to adhere that way.

8. Bake cookies for 9-14 minutes, until ever so faint cracks appear on the surface. I know 9-12 minutes is quite a range, but I find that variations in altitude and ovens really do make a difference in bake times. In my NYC toaster oven, these cookies are perfect at 8-10 minutes of baking. In Colorado, I had to go closer to 12 minutes, sometimes beyond, in the “big” oven, to get the right texture.

9. Let cool slightly (or a lot, your choice, but I can never wait too long to try these). Enjoy!

So there you have it. An easy, creative,  recipe that is so delicious, you’d never know it’s friendly to many “restricted” diets and actually kinda healthy.

Question Time:

What’s your go-to dessert?

Read Full Post »

Moist, cakey…like a cross between a cookie, a cake, and a muffin. Cream cheese icing optional. I found these cookies delicious without it.

Carrot cake is awesome, isn’t it? In cookie form, it’s pretty amazing, too. Especially when the cookie is moist and cakey at the same time, much like actual carrot cake. Bonus: cookies are soooo much more portable than cakes, or even cupcakes. Throw these in a picnic basket or lunch box, and you’re good to go.

At my last Yoga retreat.

I rigged up this recipe when looking to create a cookie  for my upcoming Yoga retreat. I wanted something with fall flavors and a comfort food vibe. I looked around online and found a handful carrot cake cookie recipes. With a few modifications, the cookies easily become healthier, with zero loss of flavor or texture.

My carrot cake cookies don’t taste “free” of anything, but they are indeed free of many common allergens, including dairy, gluten, and, if you prefer, tree nuts. Of course there’s sugar, but a moderate amount.  There is egg in them, but you could likely leave it out and just do a flax or chia “egg.” (Leave me a comment if you try it to let us know how it goes). These cookies are packed with flavor and a beautiful texture.

Carrot Cake Cookies

Yield: About 2 dozen cookies.

  • 1 cup (5 ounces) oat flour (simply grind 1 cup whole oats into a flour-like texture in your food processor or blender. If gluten free is a concern, get certified GF oats)
  • 1 Tablespoon pumpkin pie spice (Yes, it’s a lot. Trust me on this).
  • 1 teaspoon baking powder
  • 1 teaspoon baking soda
  • 1/2 teaspoon salt
  • 8 tablespoons sunflower seed butter, at room temperature (I use Trader joe’s brand; Sunbutter brand is good, too)
  • 1/2 cup packed brown sugar (dark or light both work)
  • 1 egg
  • 2 teaspoons vanilla extract
  • 1 cup grated carrots
  • 1/2 cup raisins
  • 3/4 cups old fashioned oats
  • 1/2 cup chopped walnuts (note: these ARE a tree nut; leave out if needed. I personally prefer my cookies minus nuts, and leave them out.)

1.Preheat oven to 350 degrees F.

2. In a nice, roomy mixing bowl, mix dry ingredients: oat flour, pumpkin pie spice, baking soda and powder, salt.

3. In a second roomy mixing bowl, cream sunflower seed butter, brown sugar, and vanilla. Once smooth, add egg and mix until smooth again.

4. Make a well in the wet ingredients. Gently incorporate dry ingredients, 1/3 of the mixture at a time. Fold in raisins, grated carrots, oats, and walnuts (if using).

5. Stash mix in the freezer for 10-15 minutes while you prepare  your cookies sheets. I either line mine with parchment paper, or spray them with cooking spray. One of these days I WILL get a Silpat.

6. Use a cookie scoop or a spoon to make uniform sized dough balls. (I do this by hand and spoon, and each cookie is a generous tablespoon of dough).

7. Bake cookies for 9-14 minutes, until ever so faint cracks appear on the surface. I know 9-14 minutes is quite a range, but I find that variations in altitude and ovens really do make a difference in bake times. In my NYC toaster oven, these cookies are perfect at 9-10 minutes of baking. In Colorado, I had to go closer to 14 minutes, sometimes beyond, in the “big” oven, to get the right texture.

8. Let cool slightly (or a lot, your choice, but I can never wait to try these). Enjoy!

So there you have it. An easy, creative, fall-friendly, carrot cake cookie recipe that is so delicious, you’d never know it’s friendly to many “restricted” diets and actually kinda healthy.

Question Time:

What’s your favorite fall dessert recipe?

Read Full Post »

After all the holiday sweet, I was craving savory. Meaty. Hearty. Fragrant. This is what I put together in my slow cooker,  fork-tender Crockpot Persian Saffron Lamb:

Persian lamb leg cooked in my slow-cooked, along with saffron and many other fragrant spices.

It’s a Persian-spiced boneless leg of lamb on a bed of basmati rice. Saffron enhances both the lamb and the rice. This would make a perfect New Year’s Eve or New Year’s Day dish. It’s luxurious, festive, and fragrant. Plus, quite easy to prepare.  Only a few minutes of hands-on work, then the slowcooker does the rest. Time heals all wounds, and time makes this lamb tender.


It’s a flexible recipe, too. Not a lamb fan? Use a beef pot roast instead. Into lamb but don’t have a boneless leg of lamb? Use shanks instead. In fact, I prefer lamb shanks, simply because the bone imparts so much flavor. But alas, all I had was a boneless leg of lamb, and still, the result was fantastic.  Friends of friends were begging that I send some their way. And I did 😉

Persian Saffron Lamb, Slowcooker Style

Delicious!

  •  3-4 pound boneless leg of lamb, or an equal amount of lamb shanks or beef pot roast
  • 1 onion
  • 2 Tablespoons butter, ghee, or neutral cooking oil of choice
  • 2-3 Tablespoons advieh (Persian spice mix) OR pumpkin pie spice (they have similar ingredients).
  • 2 Tablespoons ground turmeric
  • 1 teaspoon ground cumin
  • 1 teaspoon ground coriander
  • 2 Tablespoons saffron water (boil 1/4 cup water to the temperature you’d use to make tea. Add a pinch, approx 1/4 teaspoon saffron threads to the water. Refrigerate un-used portion for future use)
  • 1 head of garlic, cloves peeled and left whole
  • 1 28 ounce can of tomatoes
  • Salt and pepper to taste

1. Remove fat from lamb using a sharp knife.

2. Chop onion into half moons. In a large dutch oven. cooking pot,  or skillet, heat fat over a medium heat and add onion, stirring often.

3. Allow onion to cook about five minutes. As it cooks, salt and pepper the outside of the meat. Either remove onion from the pan altogether or put it aside. Place meat in the pot and sear it for 2-3 minutes per side…enough to get a nice crust on it. Remove meat from the pan and place, carefully, on a heat-safe surface.

4. Place onion back in the pan and add all spices EXCEPT saffron. Stir often, and cook for about 30 seconds, or until you begin to catch the scent of the spices. Put onion into slow cooker immediately.

5. Cut a few slits deep into the meat and insert the garlic cloves. Make sure the cloves are spaced evenly throughout the meat.  (Don’t worry about losing moisture from doing this…the slow cooking method will keep the meat plenty moist).

6. To the slow cooker, add the lamb, canned tomatoes, saffron water, and a pinch or two of salt and pepper (you can always adjust salt and pepper later).

7. Cook on low setting for 6-8 hours. I cooked mine for 8 hours, overnight. Once the meat is done, taste sauce, adjust seasoning accordingly, serve over rice, and enjoy!

Read Full Post »

It’s been a minute since I’ve posted a Persianized recipe on here. Sorry about that! These saffron spiced pecans are the perfect remedy to my laziness, and they make a fabulous holiday gift.

Persian spiced saffron pecans are easy to make and make delicious holiday gifts.

I apologize right now for the “spoiler,” because some of ya’ll who read this are getting these as part of your Christmas package. (Sorry, Dad, but you’re just so challenging to buy for!) If anything, after seeing this post, maybe they’ll be looking forward to their nuts.

A nice change of pace from the Yoga pants and ponytail. Tribeca, NYC, December 2011.

Anyways, I’m about done with holiday gifting. I deliberately keep my gifting list short, and am a big believer in showing appreciation and affection to friends and fam throughout the year. I do have a couple of post office runs to make to mail off gifts, and some of you know how I feel about those. Yeesh!

Things have been busy on the part-ay front as well. I’ve already been to like 4 holiday parties, with more to come. Admittedly, it’s kinda exhausting, but fun. And hey, any excuse to trade in the Yoga pants for a cocktail dress and 6-inch heels? I’m there, honey! Sometimes with bells on, literally. Jingle-ling-a-ling!  😉

Ok, let’s get it on with these nuts. (Sorry, I’m so incredibly mature…you didn’t think we were gonna get outta here without a nut pun, a Dr. Dre reference, AND an Marvin Gaye shout-out,  now did you?)

Saffron Spiced Roasted Pecans

Recipe an adaptation of one by Dorie Greenspan, from Around My French Table. Easily doubles, triples, and so on. . . .

  •  1 egg white
  • 2 Tablespoons of honey, agave, maple syrup, brown rice syrup, etc. (You choose; I used honey)
  • 2 cups whole pecans
  • 1 Tablespoon saffron water (to make, just put a pinch of saffron thread in 1/4 cup hot, not boiling water. Jar and fridge the unused portion)
  • 2 Tablespoons advieh (Persian spice mix) OR pumpkin pie spice (they have similar ingredients).
  • 1 teaspoon salt

1. Preheat oven to 300 F.  As oven heats, in a mixing bowl, run a whisk through the egg white a few times.

2. Add in honey (or sub), salt,  and spices. Whisk some more until well blended.

3. Fold in the nuts and mix to coat well with spice mixture.

4. Line your baking sheets (I used 2) with foil, and then pour nuts and any liquid into a single layer on each sheet. Bake for 20 minutes, checking for crispness at 20 minutes. If you need to bake more, do another 5 minutes. I’ve never had to bake these for more than 25 minutes.

5. Remove from oven. Let cool slightly, then carefully remove from foil. Let cool more, then bag them up in cute gift baggies.

Read Full Post »

Nutella cakes are easy to throw together.

My first memories of Nutella are from way back when, during my first semester at Columbia. That’s when I first tasted this hazelnut and chocolate blend of European origin. I’ve loved it ever since. Somehow, it brings back memories of my time at alma mater. For a lot of people, Nutella is the taste of childhood memories. For me, the taste reminds me of truly feeling like adult. On my own, in a strange city, thousands of miles from family, and being fine. Happy even.

Alma mater.

It also reminds me of one the only phases in my life during which my fridge wasn’t packed. A bit of context: I’ve never truly been That Girl with a sparsely packed fridge. (What a blessing, to have this problem). Anyways, if anything, I’m That Other Girl with both a fridge and freezer that are packed. Packed, I say. To the point that my current freezer appeared to not be working some months back. So I called my super. And he called a repairman. My landlord paid the guy to come out and tell me (wait for it). . .

. . .that my freezer was too packed, and it’d start working again swimmingly if I just got rid of some stuff, already.

Oh dear.  I’m sure my psychologist friend and I could have a field day with analyzing why I do this to my appliances.

Turns out the repairman was right. But I consoled myself by telling myself that my lack of common sense had kept this guy working, at least for part of one day. My own personal contribution to the economy, and during a recession, no less!

Nutella! One person’s taste of childhood is another’s taste of emerging adulthood.

Anyways, the point here being that my time at Columbia was about the only time that I had a fridge that wasn’t jammed to the max. I’m not sure exactly why (again, my shrink friend could probably be of help here. . .)

The edibles I did have on hand,  were of the highest quality (for a student).  In no particular order, most all of it purchased from Westside Supermarket:

  • Nutella (yes, I kept it in the fridge. No I am not THAT dumb. I just wanted to prevent myself from gobbling tons of it at room temp, because, admit it, it tastes better at room temp).
  • Smoked gouda cheese (HAD to be smoked!)
  • Almonds (usually smoked)
  • Bagged spinach
  • Alcohol (wine and vodka, mostly)
  • Lindor truffles by Lindt (this was back before they were available at a Wal-Mart near you)
  • A roasted chicken (sometimes)
  • Bread (kept in the fridge to prevent it from molding)
  • Apples
  • And yes, I had a tendency to “fridge” things that really shouldn’t be “fridged.” I’ve learned. I think.

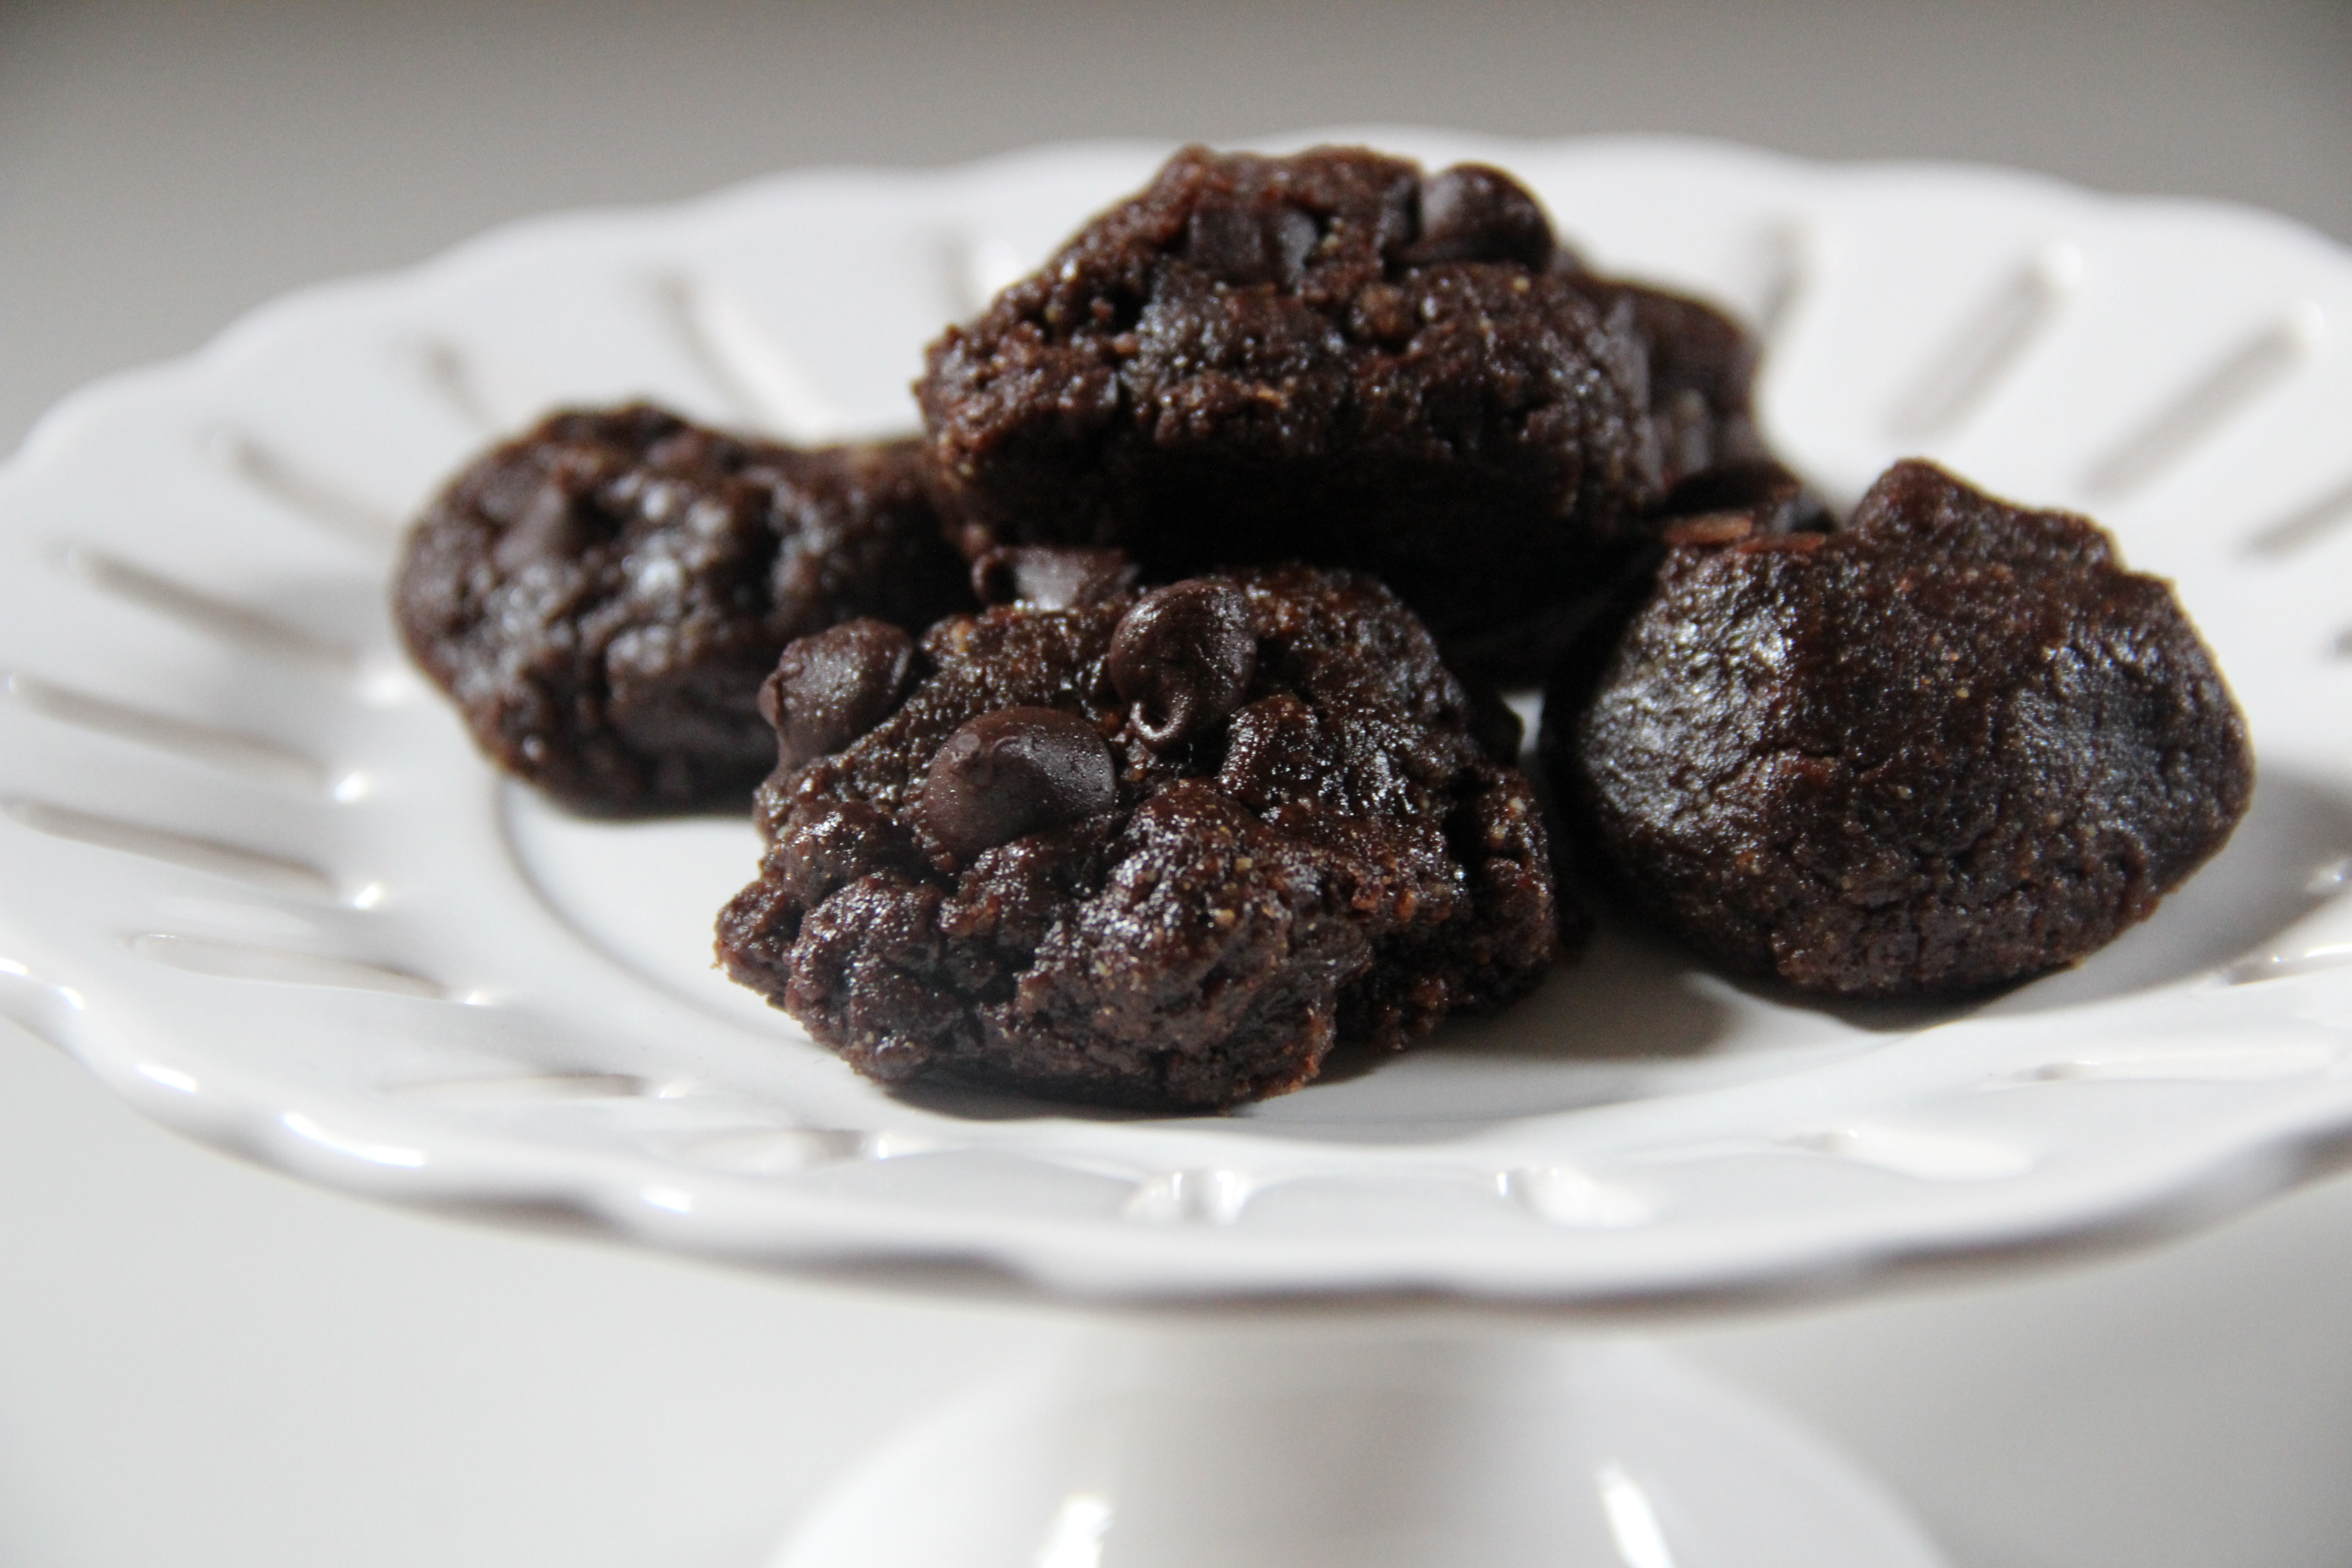
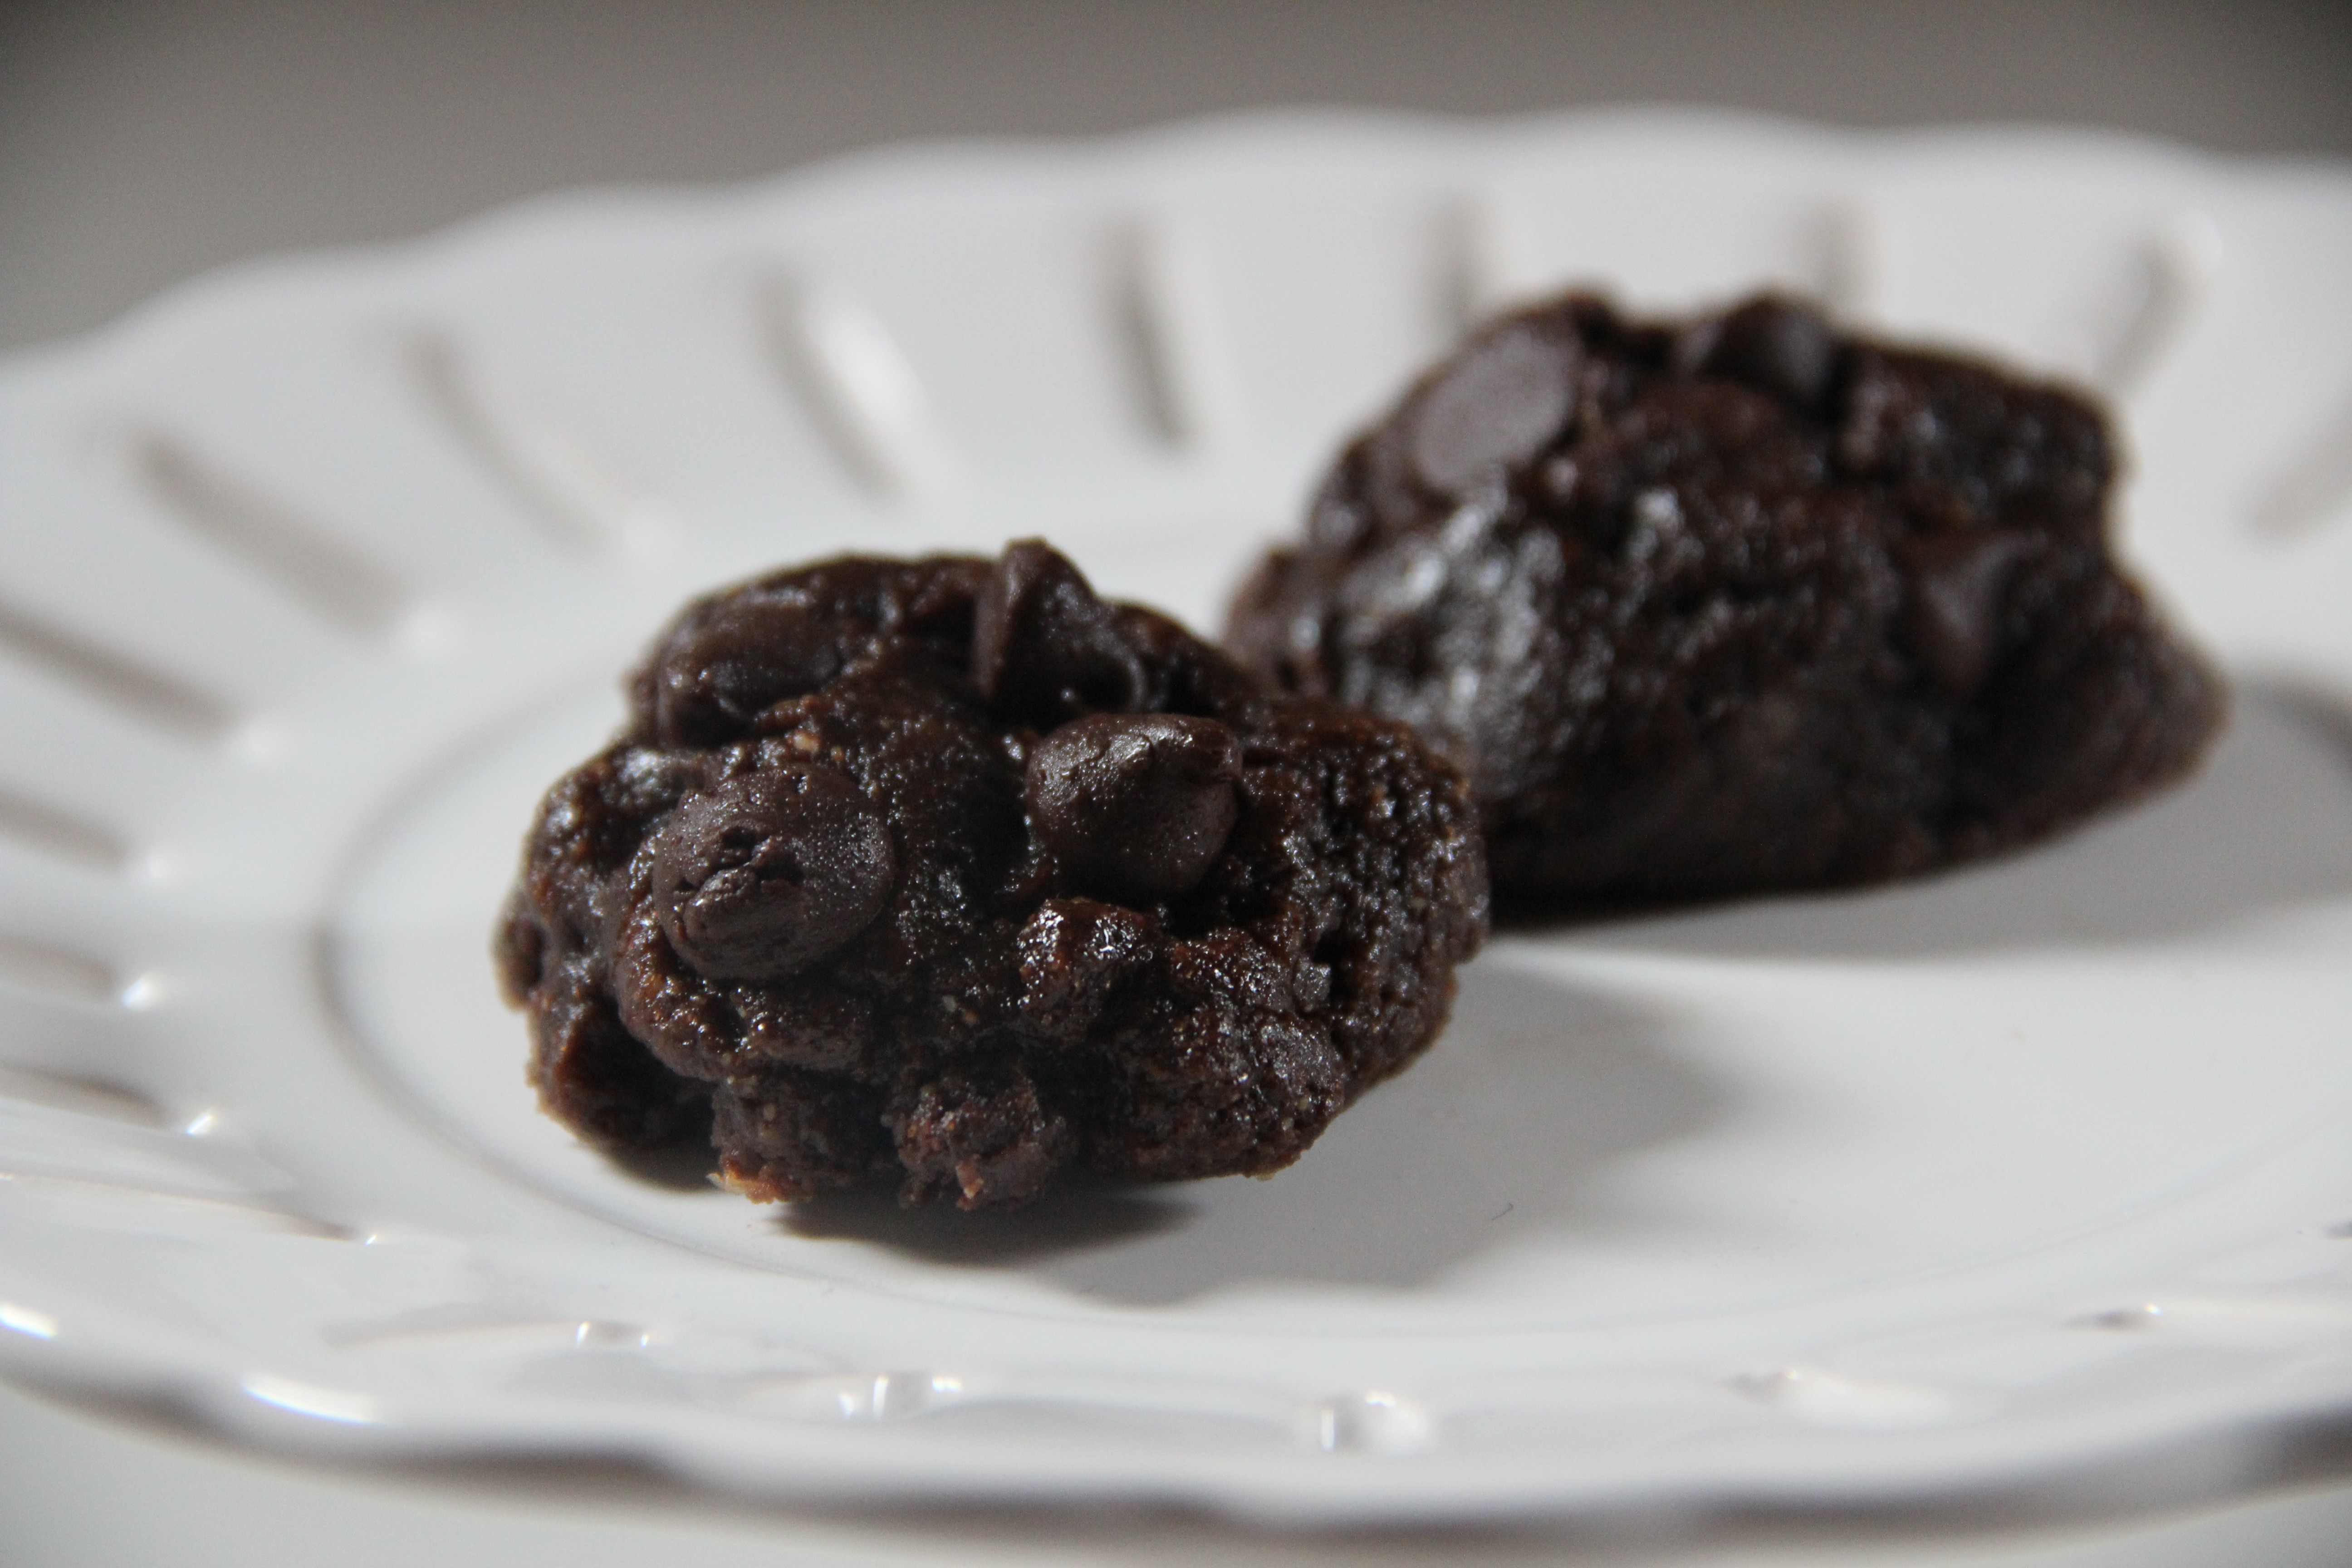
My friend dubbed these PMS cakes.

But mostly I lived off of cheese, almonds, and spoonfuls of Nutella. And I drank quite a few meals, I must say. Ahem.

I certainly wasn’t ambitious enough to throw together mini-nutella cakes back during my Columbia Daze, which is too bad, because they’re so simple. The cakes, not the Columbia Daze. Gluten-free wasn’t a buzzword back in those days, either, but hey, we’ve all moved on, haven’t we? I know I have…I’ve evolved enough that the meal I drink most nowadays is a green smoothie for breakfast. And I now realize one can eat Nutella in ways that don’t involve licking it off the spoon. At least sometimes. Ahem…

No ramekins? No problem. Use small, oven-safe coffee cups or bowls.

Nutella Cakes (Gluten Free, Kinda High in Protein)

Yield: 3 to 4 small cakes. Depends on the size of your ramekins or whatever small, oven-safe bowl you bake them in. Recipe can easily be doubled, tripled, etc.

  • 1/2 cup coconut flour (could use gluten free flour of choice, or if GF isn’t a concern, regular flour should work here, too. I like coconut flour because it’s rich, and has a lot of protein and fiber)
  • 1/2 cup Nutella (Thank you Costco, for keeping my Nutella costs in line; if vegan is a concern, find a vegan chocolate hazelnut or almond butter)
  • Splash of milk of choice (amount can vary…start out with a Tablespoon)
  • 1/3 cup chocolate chips plus a Tablespoon or two extra

1. Preheat oven to 350 F.  As oven heats, in a mixing bowl, combine the flour and milk. Mix lightly until pasty, but still pliable. If too dry, add in a bit more milk.

2. Add in Nutella and stir until combined.

3. Fold in chocolate chips.

4. Spoon mixture into small ramekins (fill them 2/3 to 3/4 full). Top each cake with a few reserved chocolate chips. Bake for 15 minutes. (Check for doneness after 10-12 minutes, by poking a knife or a fork into center of cakes). Personally, I like my cakes a bit undercooked and gooey, and hey, it’s safe to do that here, because there are no eggs in this recipe.

BRIA’S NOTE: If vegan and/or gluten free are of concern, be sure to double check all your ingredients’ labels. Can bake one at a time. Keep the remaining dough, covered, in the fridge. Load up a ramekin and bake when desired/as needed. Because we all need chocolate sometimes, yes? Plus, the one little dessert at time is a very college-like thing, isn’t it?

Read Full Post »

Buckets and buckets of dates. Date syrup is an easy way to use up dates so you can enjoy snacking on premium dates like the ones in the pic. Photo courtesy of stock.xchng

I’m loathe to waste anything. Perhaps this is a Persian thing. Or perhaps not. It’s definitely a “me” thing.

Recently, I lucked into a big, fresh batch of medjool dates. They’re creamy, caramel-y, and just perfect. But wouldn’t you know it? I had some other dates lying around that were looking pretty sad.

You know I was not going to let those sad, dried out little dates go to waste. I’d feel too guilty enjoying the plump, sassy ones I’d just been given knowing that the dry, pathetic ones were just sitting there, dessicating even more. Ha!

So date syrup to the rescue.

Me, my student Mythili, and Meera, at the Wanderlust Festival in Vermont earlier this summer. It was one interesting and fun June weekend!

Now I have a sweetener for my tea, baked goods, no-bake sweets, and whatever else I can think of. Best of all, it’s natural and makes good use of mineral-packed dates. And I get to snack on those other awesome dates guilt free. Well, not completely guilt-free. I don’t fast for Ramadan. Mad props to those who do, but I don’t. So in an act of restraint, I’ll try not to eat too many dates during the day as the fasting month kicks off in a few days. (Dates are a popular food to break the daylong fast with).

As to the recipe, it’s so simple, I’m not typing out a formal recipe. Because it’s summer and I roll super simple in the summer. Ha!  In my Vita-mix, I blended:

  • 20 dates, pits removed
  • 1 and a half cups of water
  • 1 Tablespoon of lemon juice
  • 1 teaspoon of vanilla extract

This yielded a good two cups of syrup. I just blended until it was smooth, which made the syrup liquidy and pourable. If you’re looking for a thicker texture, use less liquid.

I’ll be back at some point with a re-cap of some of my summer travel adventures, including my taking to the streets of NY on my bike. But for now, I’m off to enjoy more watermelon, which I’ve been eating tons of lately, and a chill evening. You all take care and stay cool.

Read Full Post »

At my recent Yoga retreat, quinoa was on the menu, but we ended up not making it. We had so many other delicious things, so it fell out of the rotation. I didn’t miss it, because I thought I didn’t really like it. Until now. You will, too, I bet. You could even take this to any Fourth of July festivities you might be celebrating this weekend. It’s easy to make and travels well.

I used white, also known as yellow, quinoa in my recipe. Look for it in the rice/grain section part of your store. Technically, it's not a grain. It's a seed. And it's gluten-free and very high in protein as well. Photo via wikipedia.

Back to my quinoa breakthrough. Imagine, cooking quinoa according the package directions, and it turning out awesome? Who’d have known? Certainly not me, as I’m not always one for following directions. I can barely make my own recipe the same way twice, much less another person’s. Ha!

I stumbled upon this recipe the other night when “shopping in my cabinets.” I decided to do something novel for me and made the quinoa according to the package directions (fry a cup of quinoa for 20 seconds in butter or oil, add two cups of boiling water, cover, simmer for 20 minutes, covered, over a low heat).

Happy Birthday, America. You're 235, you say? Well, you're forever 21 to me.

As it cooked, I chopped up a bunch of veggies that were hanging around unused: some roasted red peppers, celery, a couple of artichoke hearts. I added a can of (drained) white beans. Then I mixed this all into the fluffy quinoa, along with a couple of drizzles of olive oil, some ground cumin, and some Trader Joe’s 21 Salute seasoning (salt-free and very versatile!) I threw in some nutritional yeast, too.

It was a hit, and a new summer staple was born. It tastes lovely hot, cold, or at room temp. It travels well, and it’s light yet filling. It’s a flexible recipe: vary the veggies and spices and come up with  your own combos. Plus, quinoa is high in protein; along with the beans and veggies, you have a balanced one-dish meal or side.

Quinoa, I’m sorry for my past indifference and for leaving you out of the retreat festivities. I promise I’ll make it up to you somehow, someday!

Fluffy Summer Quinoa Salad

Ingredients to serve 4 as a side, 2 as a main dish:

  • 1 cup quinoa
  • oil or butter of choice
  • water
  • veggies of choice (such as peas, peppers, onions, artichoke hearts, asparagus, olive chunks, scallions, whatever you desire/have on hand)
  • 1 can of bean of choice, drained (I used white beans)
  • salt and pepper to taste
  • spice blend of choice (I used Trader Joe’s 21 Seasoning Salute)
  • ground cumin (couple of pinches)
  • nutritional yeast or parmesean cheese, grated (optional)

1. Cook quinoa according to package directions.

2. As quinoa cooks, chops up veggies, drain beans, and gather spices.

3. Once quinoa is done (takes about 20 minutes), remove from heat.  Fluff with a fork, add spices. Lightly stir. Add oil. Fluff a bit again. Add veggies and beans and stir again. Taste and adjust seasoning, oil, and veggies amounts if   needed. That’s IT!

Read Full Post »

Finally! Pancake perfection. They're gluten-free and dairy-free, too!

Pancakes are so very simple to make, yet to very easy to screw up. Bad memories, such as brunches ruined by stubborn flapjacks, burned pancakes, undercooked pancakes, tough pancakes, and just plain fugly pancakes kept my expectations low for my recent flapjack foray.

Try adding a gluten and dairy free caveat to the recipe requirement and the ante is upped. So I figured the best thing to do was relax.

Have you ever noticed how sometimes things turn out the best when you have zero expectations?

Closer, closer. See how fluffy they are?On a recent random workday, between teaching classes and a challenging workout, a serious pancake craving hit me. So I threw together the only pancake mix I had on hand, a gluten-free Bob’s Red Mill mix. Because I love sunflower seed butter and wanted to bump up the protein content of my cakes, I added approximately three tablespoons of that stuff. Good call! Instead of cow’s milk, I used some creamy coconut milk from Silk that I had on hand.

The resulting cakes were fluffy, tender, and oh-so-satisfying. Perhaps the best I’ve ever made, and quite possibly the best I’ve ever eaten. Not bad for someone with an uneasy relationship with pancakes!

Want to snag the gluten free flour and coconut oil at a steep discount? Roll on over to iherb and use my coupon code, TAV642, for $5 off of your first order. Orders of $40 or more ship FREE. Trust me, you can get tons of good stuff at iherb for $40: vitamins, supplements, protein powders, chia seeds, soaps, and tons of other cool stuff. Ok, now for the recipe:

Victorious Gluten Free Sun Butter Pancakes

Yield: approx 12 pancakes. I made 2 for myself and put the rest of the batter in the fridge to use throughout the week.

  • 1 and 1/2 cups Bob’s Red Mill Gluten Free Pancake Mix
  • 1 cup coconut milk (I used the new coco milk by Silk; it doesn’t taste coconutty to me at all, but IS creamy)
  • 1 large egg (for vegans, you could try your luck with a flax or chia seed egg or another egg stand-in. Look here for deets.)
  • 1 teaspoon vanilla extract
  • 3 Tablespoons Sunflower Seed Butter (I used Trader Joe’s brand; I’m sure any other nut butter would be great in here)
  • 2 or more Tablespoons coconut oil for greasing pan

1. I mixed all ingredients except for the coconut oil in my Vita-Mix. Because I’m crazy like that and really love any excuse to use the Vita. You can surely mix your ingredients by hand, as described on the pancake mix package directions. (Just remember to leave OUT the oil the package directions call for. Because you’re using more than enough oil by using nut butter; plus the nut butter adds an awesome flavor and protein to the mix).

2. Heat the coconut oil over medium heat in a nonstick pan. Don’t skimp on the oil in this part of the recipe!  Use more if you need to. Trust me on this. Then dollop about 1/3 of a cup of batter in the pan. I did one pancake at a time. Depending on the size of your skillet, you could do 2-4 at a time.

3. When the pancakes are bubbly all over, gently and carefully flip them over and allow them to brown on the other side. Then wrap them in foil and place in a low heat oven or toaster oven to keep warm. Or just eat immediately.

Half-eaten and fully delicious!

Read Full Post »

Pistachio Nut Butter with a touch of honey. It's actually very easy to make your own pistachio butter.

Lately I’ve been “shopping” in my own pantry and fridge to use up goodies already on hand and keep some money in my pocket. There is so much upheaval and need in the world on any given day, but lately it seems like so much is going on. It gets a bit overwhelming sometimes. So I’m focusing on having an attitude of gratitude and creating more with less.

It just so happens that I am lucky enough to have a surplus of pistachios at the moment, so I decided to make a nut butter with them. It took all of five minutes, turned out great, and I already have some easy recipes ideas in mind to use it in. Anything that’s good, I’ll share with you.

Of course, it’s quite delicious on its own. Or melted a bit on top of ice cream, in a sandwich, or mixed into oatmeal. Those are just a few ideas; as you can see, there are tons of uses for this stuff, as with any nut butter. Leave your ideas in the comments.

Stay tuned for some upgrades to West of Persia. I’m working on an Amazon store for the site, and also have a cool giveaway coming up.  Have a great day!

NOTE: Take a look at your blender or food processor’s instructions for making nut butters, and adjust your use of your machine as needed when making this, or any,  nut butter. I made mine with my Vita-Mix, and just used the wet blade (I don’t own the dry blade).

Homemade Pistachio-Honey Nut Butter

For approx 2/3 cup of nut butter:

  • 1 cup pistachios, shells removed
  • 2-3 Tablespoons oil (I used grapeseed oil)
  • 1 Tablespoon honey
  • 1-2 Tablespoons water

1. Grind the nuts in your machine until they’re broken down into chunks, but NOT pulverized.

2. Now add in oil, a Tablespoon at a time. Also add in honey and about half a tablespoon of water. Grind on low as a paste begins to form.

3. Stop blender, scrape down sides, and re-blend, adding water IF NEEDED little by little to get (or keep) things moving. Repeat this step as needed. Stop blending when the desired consistency is reached. I like my nut butters chunky sometimes, so I left this pistachio butter on the chunky side this time.

Read Full Post »

Older Posts »