Feeds:
Posts
Comments

Posts Tagged ‘Chocolate’

 
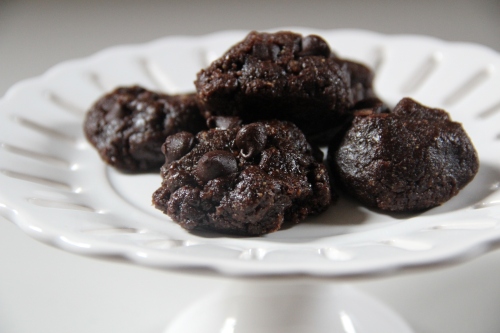
Double Chocolate Chunk Cookies are fudgey, brownie and cookie-like all at once. You'd never believe they're free of many common allergens, including gluten, dairy, and can easily be made minus eggs and tree nuts.

Double Chocolate Chunk Cookies are fudgey, brownie and cookie-like all at once. You’d never believe they’re free of many common allergens, including gluten, dairy, and can easily be made free of eggs and tree nuts. Cookie photos by Kristen Joerger of tiny-gourmet.com  .

This Double Chocolate Chunk Cookie recipe post has literally been years in the making.  A couple of years ago, I ran across a cookie recipe I really liked, and tinkered with it.  Soon, I was baking these babies up, and taking them to house parties, to weekends away, on hikes, and on road trips. People LOVE these cookies. I’ve heard people go so far as to call them “The best cookies I’ve ever had in my life.”
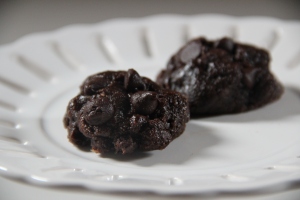
cookiesI’d bet money they’ve gotten me invited back a few places 😉

They were a huge hit at my most recent yoga retreat.

People always request this recipe, yet I always got sidetracked.

You’d never guess these cookies are free of many common allergens. My goal was to make them taste chocolately and decadent, not diet. These cookies have no:

  • gluten
  • dairy
  • egg (if you choose to veganize them, that is)
  • or tree nuts (if you choose the tree nut free option, that is)

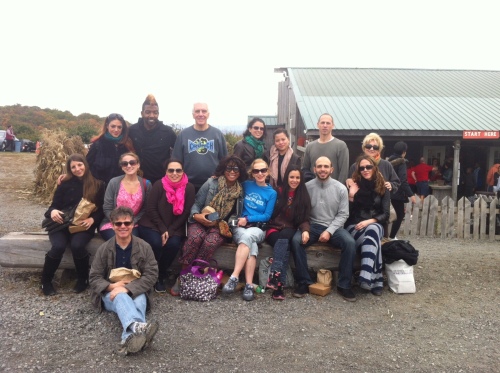
Here are some of us at my most recent yoga retreat in upstate New York:

fall retreat group shot 2013 upstate

This magic batter traveled with me to my most recent yoga retreat, and the cookies were a huge hit when we packed them into the bagged picnic lunches we took with us to the apple orchard.

These cookies are packed with flavor and a beautiful texture.

Bria’s Double Chocolate Chunk Cookies.

Yield: About 2 dozen cookies.

  • 1 cup peanut butter (or almond butter, or, to go tree nut free, use sunflower seed butter.)
  • 1 cup UNSweetened cocoa powder
  • 1 cup of brown sugar (I prefer dark brown)
  • 1 egg (replace egg by combining 1 tbsp ground flax seeds + 3 tbsp warm water in a small bowl and stirring.  Allow a “jelly” to form after a few minutes and use this as your “egg”)
  • pinch teaspoon salt (leave out if your peanut butter is salted)
  • 2 teaspoons vanilla extract
  • 1 cup chocolate chips, chunks, or half a cup of each (I used Trader Joe’s brand, as they are free of dairy)

1.Preheat oven to 350 degrees F.

2. In a nice, roomy mixing bowl, cream together peanut butter, brown sugar, egg, and vanilla.

3. Begin adding in cocoa powder, 1/4 cup at a time, and mix until well incorporated and moist. If the batter gets too dry, add in bit of water, leftover coffee, or milk of choice to loosen it. Then remix. If batter becomes too loose, add in more cocoa powder to tighten it up.

4. Fold in 3/4 of the chocolate chips and/or chunks. Save the rest for garnish.

5. OPTIONAL/not always necessary: Stash mix in the freezer for 10-15 minutes while you prepare  your cookies sheets. I either line mine with parchment paper, or spray them with cooking spray. One of these days I WILL get a Silpat.

6. Use a cookie scoop or a spoon to make uniform sized dough balls. (I do this by hand and spoon, and each cookie is a generous tablespoon of dough). Do NOT smash cookies down.

7. Place 3-5 chocolate chips and/or chunks on the top of the cookies. You can flip the cookie dough ball upside down and get the chips to adhere that way.

8. Bake cookies for 9-14 minutes, until ever so faint cracks appear on the surface. I know 9-12 minutes is quite a range, but I find that variations in altitude and ovens really do make a difference in bake times. In my NYC toaster oven, these cookies are perfect at 8-10 minutes of baking. In Colorado, I had to go closer to 12 minutes, sometimes beyond, in the “big” oven, to get the right texture.

9. Let cool slightly (or a lot, your choice, but I can never wait too long to try these). Enjoy!

So there you have it. An easy, creative,  recipe that is so delicious, you’d never know it’s friendly to many “restricted” diets and actually kinda healthy.

Question Time:

What’s your go-to dessert?
Read Full Post »

Nutella cakes are easy to throw together.

My first memories of Nutella are from way back when, during my first semester at Columbia. That’s when I first tasted this hazelnut and chocolate blend of European origin. I’ve loved it ever since. Somehow, it brings back memories of my time at alma mater. For a lot of people, Nutella is the taste of childhood memories. For me, the taste reminds me of truly feeling like adult. On my own, in a strange city, thousands of miles from family, and being fine. Happy even.

Alma mater.

It also reminds me of one the only phases in my life during which my fridge wasn’t packed. A bit of context: I’ve never truly been That Girl with a sparsely packed fridge. (What a blessing, to have this problem). Anyways, if anything, I’m That Other Girl with both a fridge and freezer that are packed. Packed, I say. To the point that my current freezer appeared to not be working some months back. So I called my super. And he called a repairman. My landlord paid the guy to come out and tell me (wait for it). . .

. . .that my freezer was too packed, and it’d start working again swimmingly if I just got rid of some stuff, already.

Oh dear.  I’m sure my psychologist friend and I could have a field day with analyzing why I do this to my appliances.

Turns out the repairman was right. But I consoled myself by telling myself that my lack of common sense had kept this guy working, at least for part of one day. My own personal contribution to the economy, and during a recession, no less!

Nutella! One person’s taste of childhood is another’s taste of emerging adulthood.

Anyways, the point here being that my time at Columbia was about the only time that I had a fridge that wasn’t jammed to the max. I’m not sure exactly why (again, my shrink friend could probably be of help here. . .)

The edibles I did have on hand,  were of the highest quality (for a student).  In no particular order, most all of it purchased from Westside Supermarket:

  • Nutella (yes, I kept it in the fridge. No I am not THAT dumb. I just wanted to prevent myself from gobbling tons of it at room temp, because, admit it, it tastes better at room temp).
  • Smoked gouda cheese (HAD to be smoked!)
  • Almonds (usually smoked)
  • Bagged spinach
  • Alcohol (wine and vodka, mostly)
  • Lindor truffles by Lindt (this was back before they were available at a Wal-Mart near you)
  • A roasted chicken (sometimes)
  • Bread (kept in the fridge to prevent it from molding)
  • Apples
  • And yes, I had a tendency to “fridge” things that really shouldn’t be “fridged.” I’ve learned. I think.

My friend dubbed these PMS cakes.

But mostly I lived off of cheese, almonds, and spoonfuls of Nutella. And I drank quite a few meals, I must say. Ahem.

I certainly wasn’t ambitious enough to throw together mini-nutella cakes back during my Columbia Daze, which is too bad, because they’re so simple. The cakes, not the Columbia Daze. Gluten-free wasn’t a buzzword back in those days, either, but hey, we’ve all moved on, haven’t we? I know I have…I’ve evolved enough that the meal I drink most nowadays is a green smoothie for breakfast. And I now realize one can eat Nutella in ways that don’t involve licking it off the spoon. At least sometimes. Ahem…

No ramekins? No problem. Use small, oven-safe coffee cups or bowls.

Nutella Cakes (Gluten Free, Kinda High in Protein)

Yield: 3 to 4 small cakes. Depends on the size of your ramekins or whatever small, oven-safe bowl you bake them in. Recipe can easily be doubled, tripled, etc.

  • 1/2 cup coconut flour (could use gluten free flour of choice, or if GF isn’t a concern, regular flour should work here, too. I like coconut flour because it’s rich, and has a lot of protein and fiber)
  • 1/2 cup Nutella (Thank you Costco, for keeping my Nutella costs in line; if vegan is a concern, find a vegan chocolate hazelnut or almond butter)
  • Splash of milk of choice (amount can vary…start out with a Tablespoon)
  • 1/3 cup chocolate chips plus a Tablespoon or two extra

1. Preheat oven to 350 F.  As oven heats, in a mixing bowl, combine the flour and milk. Mix lightly until pasty, but still pliable. If too dry, add in a bit more milk.

2. Add in Nutella and stir until combined.

3. Fold in chocolate chips.

4. Spoon mixture into small ramekins (fill them 2/3 to 3/4 full). Top each cake with a few reserved chocolate chips. Bake for 15 minutes. (Check for doneness after 10-12 minutes, by poking a knife or a fork into center of cakes). Personally, I like my cakes a bit undercooked and gooey, and hey, it’s safe to do that here, because there are no eggs in this recipe.

BRIA’S NOTE: If vegan and/or gluten free are of concern, be sure to double check all your ingredients’ labels. Can bake one at a time. Keep the remaining dough, covered, in the fridge. Load up a ramekin and bake when desired/as needed. Because we all need chocolate sometimes, yes? Plus, the one little dessert at time is a very college-like thing, isn’t it?

Read Full Post »

Stressing over making a homemade dessert for Valentine’s Day? Don’t worry, my loves, I gotcha covered with a few simple, quick options:

Chocolate Almond and Apricot Truffles

Chocolate almond apricot truffles are an easy cookie to make. Gluten-free flour works in this recipe, by the way (I used Bob's Red Mill).

Or you could salvage a broken cake with my Chocolate Cherry Trifle:

This trifle is any easy way to salvage a broken cake, or use up leftover chunks of chocolate cake or brownies. The layers make it look pretty and deliberate 😉

Another fun and easy option: Molten Chocolate Cakes with a Middle Eastern Flair

This cake is really molten, to the point of oozing apart like lava. Ha! If you'd rather keep it together, just bake in ramekins to serve.

If chocolate’s not your bag, but jewels are, consider:

Bejeweled Biscotti with a Persian Twist:

Persianized biscotti. Yes, these cookies could be dipped in melted chocolate, if you're so inclined.

Dunk your biscotti in some Persian Hot Chocolate:

!

Hot chocolate infused with the finest Persian saffron and cardamom? Win!

Portion Control a Concern? Try:

Frozen Hot Chocolate “Shots” With a Goat Yogurt Topping

Petite shots of chocolately goodness!

I hope these options help. I’m working on one more chocolatey goody, which tastes amazing, and is gluten and dairy free. I’ll post it soon.

Read Full Post »

In my world, no holiday is needed to enjoy chocolate, but the holidays sure are a great excuse to do just that. I posted this recipe last year, almost exactly a year ago, in fact. It stands the test of time, and it’s worth sharing with everyone again.

Like many of you, I’ve hardly had time lately to eat a cookie, much less bake them. But my plan is to carve out some time this weekend to make some of these dreamy, delicious, chocolately drops of goodness.  Thankfully, the recipe is simple.  You’ll be impressed at how the flavors of chocolate, cardamom, and sour cherry play off of each other.

Enjoy and have a fabulous weekend!

Note: Adapted from  a recipe in the December 2009 issue of Body + Soul Magazine. Photo to the right by Stacey Young.

Chocolate Drop Cookies with Sour Cherries and Pistachios

Prep time- 15-20 minutes

Cook time- 8 minutes Max

Yield: 5 dozen (or slightly less if you like cookie dough as much as I do)

Ingredients

  • 1/4 cup unsweetened cocoa
  • 1/4 cup all-purpose flour (I used pastry flour, and it worked perfectly)
  • 1 scant teaspoon cardamom powder
  • 3 egg whites (save the yolks for another use. Perhaps for a custard or for feeding a pet)
  • Small pinch of salt
  • 2/3 cup confectioners’ sugar
  • 1/2 teaspoon vanilla extract
  • 1 cup bittersweet or semisweet chocolate chunks or chips, melted and cooled (If you are avoiding dairy, check the ingredient list to make sure there are no milk products in the chocolate chips/chunks).
  • Generous 1/3 cup chopped, dried sour cherries
  • Generous 1/3 cup toasted pistachios plus approx. 2-3 Tablespoons more for garnishing tops of cookies
  • Generous 1/3 cup chocolate chips or chunks, NOT melted

Directions:

1. Preheat oven to 375 F.

2. In a small bowl, whisk together the cocoa and flour and cardamom powder.

3. With a hand mixer, or a stand-up mixer fitted with a whisk attachment, beat the egg whites and salt at medium speed until frothy. (You’ll see bubbles). With the mixer running, slowly add in the confectioners’ sugar. When all of it has been added, raise the speed to high, and beat until the egg whites are the consistency of marshmallows. Now beat in the vanilla.

4. Reduce the mixer speed to medium, and beat in half of the melted, cooled chocolate. Then beat in half of the cocoa-flour mixture, scraping the sides of the bowl to incorporate all ingredients. Repeat with the rest of the chocolate and cocoa-flour mix. Stop the mixer.

5. By hand, gently fold in the cherries, pistachios, and chocolate chips or chunks. Let sit until thick enough to scoop, about 5 minutes.

6. As dough sets, prepare parchment paper and place on cookies sheets.

7. Now it’s time to scoop the cookie dough onto the cookie sheets. Scoop by the level teaspoonful. Leave about an inch in between cookies. Try to keep the cookies the same size to ensure they cook evenly.

8. Garnish cookies with whole and/or pistachio pieces. Looks so festive and pretty!

9. Bake 6-8 minutes, until cookies are a bit cracked on the outside. (I personally like my cookies on the soft, moist, and chewy side, so 7 minutes was plenty of time for mine in my particular oven. If, like me, you prefer softer cookies, remember, they might look slightly undercooked when first taken out of the oven).

10. Remove from oven and let cool. This is the part where recipes always say to cool the baked goods on a wire rack. Well, I don’t own any wire racks, so mine just cooled on the sheets, and no one’s complaining.

Approximate Nutrition facts from Body + Soul Magazine:

Note, my version is probably a bit more caloric, due to my heavy hand with the cherries, pistachios, and also due to the fact that I added in extra chocolate chips :-) Hey, it’s the holidays! :

Per cookie:

30 Calories

1 gram protein

4 grams carbohydrates

1.5 grams of fat (0.7 saturated)

0 grams of fiber


Updated to Add a BONUS: Fun Weekend Contest. Win a $50 shopping spree on one of my favorite sites, iherb.com . Stop by Love Veggies and Yoga, one of my favorite blogs, to find out how.

Read Full Post »


Hot cocoa with some chai spices thrown in . . .a joyful morning delight.


In my world, few things make a morning more tolerable, maybe even a tad joyful, than a steaming cup of homemade hot cocoa. I actually somewhat look forward to the cold winter mornings for this very reason. Perhaps this means I need to investigate the possibility of getting a life, but hey, there’s nothing wrong with being amused by the smaller, simpler pleasures, right?

Community garden in Harlem that I spotted on a recent walk. Sadly, this sliver of property, sandwiched in between brownstones, is for sale. I wish it could stay as it is–a wonderful seasonal space.

It’s fun to play around with the flavorings of hot chocolate. Like my Persian Hot Chocolate–dark chocolate infused with cardamom and saffron. Here are my tips on how to make the perfect cup:

  • Always use the highest quality cocoa powder (or nibs, or whatever) you can find. Droste’s is a good brand that costs a bit more, but I find worth it.
  • Go with unsweetened if possible. Just try it! Dark and unsweetened is my personal favorite. You can always add sweetness to your taste. Who knows, you may come to love, as I sometimes do, a cup of unsweetened hot cocoa.
  • Use milk for a rich and creamy taste, but definitely consider dairy alternatives. Some of my favorite hot chocolate “base” milks are coconut milk, hazelnut milk, almond milk, and rice milk.
  • Have fun and get creative flavoring your drink. Take a hint from coffeehouses. Mint mocha? Mint hot chocolate!  Hazelnut flavoring? Hazelnut hot choc. Chai Latte? How about a Chocolate Chai Latte? In fact, let’s do that now:

Hot Chocolate Chai Latte

For one serving:

  • 8 ounces milk of choice
  • 2 generous Tablespoons cocoa powder
  • 1 Chai tea teabag OR a quarter-sized chunk of fresh ginger, a few black peppercorns, and a cinnamon stick (or a teaspoon of cinnamon powder)
  • 1/2 teaspoon of vanilla extract (optional)
  • Sweetener of choice (stevia, sugar, etc)

Directions:
1. Warm a non-reactive sauce pan under low heat. Add in chocolate and lightly “toast” for 20-30 seconds over low heat to bring out the flavors.

2. Add in one-third of the milk and whisk until chocolate is lump-free and well-dissolved into the milk.

3. Add in the rest of the milk and whisk again. If using the teabag, add it in now. Or, add in the fresh ginger, peppercorns, and cinnamon. This allows the spicy flavors to infuse.

4. Do not boil, but cook on low heat until the edges of the milk start to bubble.

5.  Stir in vanilla (if using) and remove from heat. Pour into serving cup of choice.

6.  If using sweetener, sweeten to taste and enjoy!

Read Full Post »


Chin up, darling, and no tears over that messed up cake. A broken chocolate cake shouldn't be tossed into the trash, or even to the birds. Make a gorgeous and delicious chocolate trifle instead. Ok, guys, stop laughing at the oh-so-professional studio background I've got goin' here 😉

Oh dear. A kitchen mishap. Big plans to bake a chocolatey, decadent, gorgeous birthday cake for a loved one. Said cake recipe was new to me and untested in my kitchen.

A vertical view of this layered beauty. Layers of goodies abound.

Plus, I was having a bit of a trying day. Not to get all “Like Water for Chocolate” on you guys here, but I find cooking when I’m sad often leads to mishaps. Long story short, the cake fell to pieces when I tried to invert the layers out of the pans. Whoops.

In the back of my mind, I’ve always said that if something like this were ever to happen to me, I’d salvage the situation by making a trifle. And part of me has longed to make a trifle, but not yet found quite the right occasion/excuse to do so.

Quickie behind-the-scenes self portrait. Ooops, kept the flash on. Well, today's entry is all about mistakes, right?

Now, apparently that day had come, whether I was ready for it or not. Had I willed this into being? Obviously, all of my preaching to my Yoga students about going with the flow was coming home to roost with yours truly. This just might have been a test. Okay, let’s do this, then!

Luckily, no one was expecting a picture perfect cake anyways, so the incident wasn’t a big deal, except in my mind. The trifle was creamy, fun and festive dessert, and crisis was averted. No tears were shed.

The lesson here? I think it’s don’t cry over  broken cakes, my friends. It’s generally not worth it. And there’s always tomorrow, or some alternative iteration of a recipe to save the day right now.

Here's another behind-the-scenes self-portrait. Hee hee, I'm feeling silly now.

Accidental Chocolate Cherry Trifle

Ingredients:

1 to 2 layers of chocolate cake, cut into large chunks (or one small pound cake loaf, in chunks)

1/2 cup of sour cherry jam

1/4 cup dried sour cherries

6 ounces chocolate chips or chunks (bittersweet or semisweet)

3/4 cup coconut milk

1 teaspoon each vanilla extract and almond extract

2 tablespoons almond slivers (toasting optional)

For garnish: white chocolate bits and dark chocolate bits

Directions:

1. Make vegan ganache. Warm coconut milk over low heat. Don’t boil. As milk heats, place chocolate bits in a heat resistant bowl. Slowly pour warmed milk over chocolate chunks, stirring frequently until smooth. Add in vanilla and almond extracts and stir again. Allow ganache to cool and thicken slightly.

2. In a see through dessert glass or jar, spoon in some cherry jam. Top with a layer of cake, then a layer of chocolate ganache, then some dried cherries. Repeat layers, ending with a dollop of ganache. Garnish this with white and dark chocolate curls (Make the curls with a veggie peeler). Put some dried sour cherries on top if you want.

3. Enjoy, and no tears, love. Act like this was the dessert you meant to make, and no one will be any the wiser 😉

Read Full Post »

First a rose, then scroll down for a video of me showing you how to make chocolate dipped figs and dates. Easy, quick, and on the healthy side.

The Grand Finale is to our West of Persia Chocolate Week is finally here. My gift to you? Video!

Yep, it’s video of today’s recipe, Chocolate Dipped Dates and Figs. Of all of the chocolate recipes I’ve featured this week, this is the easiest, fastest, and perhaps the healthiest. Please note that while I do use the microwave in this video, and am indeed squatting by it in the screen shot below (LOL!) I no longer use it at home. (This video was shot a while back). Why do I now skip the micro? Health reasons. Plus, I wanted more room for my tea collection 😉 I’ll write  in detail about all of  that at another time.

For now, just know that melting the chocolate over low heat in a non-reactive saucepan should work just fine, as long as you don’t walk away and keep that spatula or spoon moving.

I figured posting this on Friday would be perfect for those of you who might have waiting until the last minute 😉 to gather ingredients for any Valentine’s Day sweets you might be making. You may very well have the ingredients on hand for this recipe. For now, let’s roll that tape. I mean, video 😉

Read Full Post »

Flowers anyone? Pink tulips I bought yesterday in the snowstorm. They add such a fresh burst of color.

Chocolate week continues here on West of Persia, with easy chocolate recipes in honor of Valentine’s Day, and also in honor of chocolate in general. As you may have noticed, I’m sort of in love with chocolate. But as I was melting chocolate at 8 in the morning today, even I had to think , “This is slightly insane!” By the time the actual Valentine’s Day roll around, I may indeed have hit chocolate fatigue. Maybe.

Chocolate-Apricot-Almond Cookies are petite, chewy, and simple to make. They travel well, so feel free to box them up or present them on a pretty platter for a fun and delicious gift.

So this recipe is based on another I posted back in December. Chocolate Drop Cookies with Sour Cherries and Pistachios.

Chocolate drops with Sour Cherries and Pistachios were a hit around the holidays. Like today's cookie, they have a brownie like texture and a rich flavor.

In today’s truffle cookie, we are using slightly different flavorings, plus apricots and almonds as our fruit and nuts respectively.  At right is a not really necessary but still fun pic of the  Chocolate drops with Sour Cherries and Pistachios.

Now on to today’s cookie:

Chocolate-Apricot-Almond Truffle Cookies

Prep time- 15-20 minutes

Cook time- 8 minutes Max

Yield: 5 dozen (or slightly less if you like cookie dough as much as I do)

Ingredients:

1/4 cup unsweetened cocoa

1/4 cup all-purpose flour (I used pastry flour, and it worked perfectly)

1 scant teaspoon cardamom powder

1 scant teaspoon freshly ground allspice

3 egg whites (save the yolks for another use. Perhaps for a custard or for feeding a pet)

Small pinch of salt

2/3 cup confectioners’ sugar

1/2 teaspoon vanilla extract

1 teaspoon almond extract

1 cup bittersweet or semisweet chocolate chunks or chips, melted and cooled (If you are avoiding dairy, check the ingredient list to make sure there are no milk products in the chocolate chips/chunks).

Generous 1/3 cup chopped, dried apricots, plus approx 2-3 Tablespoons more for garnishing.

Generous 1/3 cup slivered almonds, plus approx. 2-3 Tablespoons more for garnishing tops of cookies

Generous 1/3 cup chocolate chips or chunks, NOT melted

Optional: 3-4 ounces chocolate, melted.

Directions:

1. Preheat oven to 375 F.

2. In a small bowl, whisk together the cocoa and flour and cardamom powder.

3. With a hand mixer, or a stand-up mixer fitted with a whisk attachment, beat the egg whites and salt at medium speed until frothy. (You’ll see bubbles). With the mixer running, slowly add in the confectioners’ sugar. When all of it has been added, raise the speed to high, and beat until the egg whites are the consistency of marshmallows. (This took me about 5 minutes with the hand mixer. Yes, I’m low-tech like that. The gorgeous Kitchen Aid stand mixer has yet to make an appearance in my life. St. Valentine, are you listening?) Now beat in the vanilla.

4. Reduce the mixer speed to medium, and beat in half of the melted, cooled chocolate. Then beat in half of the cocoa-flour mixture, scraping the sides of the bowl to incorporate all ingredients. Repeat with the rest of the chocolate and cocoa-flour mix. Stop the mixer.

5. By hand, gently fold in the apricots, almonds, and chocolate chips or chunks. Let sit until thick enough to scoop, about 5 minutes.

6. As dough sets, prepare parchment paper and place on cookies sheets.

7. Now it’s time to scoop the cookie dough onto the cookie sheets. Scoop by the level teaspoonful. Leave about an inch in between cookies. Try to keep the cookies the same size to ensure they cook evenly.

8. Garnish cookies with almond pieces and bits of apricot. Looks so festive and pretty!

9. Bake 5-8 minutes, until cookies are a bit cracked on the outside. (I personally like my cookies on the soft, moist, and chewy side, so 5 minutes was plenty of time for mine in my particular toaster oven.  In the big oven, these cookies take about 7 minutes. If, like me, you prefer softer cookies, remember, they might look slightly undercooked when first taken out of the oven).

10. Remove from oven and let cool. This is the part where recipes always say to cool the baked goods on a wire rack. Well, I don’t own any wire racks, so mine just cooled on the sheets, and no one’s complaining.

11. OPTIONAL: To make the cookies more truffle like, do this: As the cookies are cooling, melt the 3-4 ounces of chocolate. Then dip the underside of the cooled cookies in the warm chocolate and allow to cool.

Read Full Post »

Frozen Hot Chocolate with an optional dollop of creamy goat milk yogurt and a dusting of nutmeg to give it a Middle Eastern flair. Leave out the goat yogurt and use a non-dairy milk and voila! It's vegan. Either way, it's elegant, portion-controlled, and so smooth!

Does this ever happen to you? The weather is cold. Even snowing, perhaps, like it is in New York City at this very moment. And all of a sudden, nothing sounds quite as good as a frozen treat of some kind?

This sort of thing definitely happens to me. Maybe it’s the warmth of being indoors. Or not; I’ve had these cravings strike while trudging through a blizzard. No joke.

Craving cool sweets in this type of weather? Why yes, I sometimes do.

At times like these, my easy Frozen Hot Chocolate could fit the bill nicely. It’s quick and simple to make, and there are many options as to how you take your chocolate. You could drink it immediately, or let it chill overnight in the fridge so that it takes an almost pudding-like texture. Plus, there are numerous ways to top this treat. I like to keep it simple, so let’s get right down to the base recipe:

A versatile and easy recipe that can be enjoyed immediately or later on.I prefer mine plain, but a dollop of goat yogurt and a sprinkling of nutmeg looks and tastes lovely, too.

Frozen Hot Chocolate w/Optional Goat Yogurt Topping

Ingredients:

1 1/2 ounces bittersweet or unsweetened dark chocolate

2 Tablespoons agave nectar or granulated sugar (you can adjust this amount to your taste)

1 teaspoon unsweetened cocoa powder

1/4 cup and also 1/2 cup milk of choice (I used a combo of rice milk and coconut milk)

1/2 teaspoon vanilla extract

1/1/2 cups ice (approx 8 standard ice cubes)

Optional: extra thick (strained) goat yogurt for topping

Other optional toppings: ground nutmeg, cocoa powder, cinnamon, chocolate shavings. Feel free to get creative or leave out the toppings entirely.

Directions:

1.  Over a low heat, gently melt chocolate chips or chunks. Stir frequently to prevent burning or sticking. Remove from heat and use a spatula to transfer the chocolate to a medium-sized bowl.

2. Into the chocolate, whisk in the sweetener of choice, adjusting the amount to your taste.  Whisk in cocoa powder and vanilla extract and make sure the mixture is well-blended.

3. Let this mixture cool slightly, then stir in 1/4 cup of the milk. (You could stop here and have a very thick, rich, no bake mousse/pudding like scenario. Or you could continue on. . .)

4. Now puree chocolate mixture, the 1/2 cup of milk and the ice in a blender.

5. Divide between 4 shot glasses or espresso cups. Enjoy immediately, or chill overnight and top with toppings of choice. If you chill this mixture overnight, it will have a thicker texture that’s almost pudding-like that you can drink or enjoy with a spoon.

Read Full Post »

Not your average Chocolate Volcano Cake. Oh no, this one has a hint of cardamom, a splash of orange blossom water, and the teensiest bit of pepper in the batter. Perfect served warm. Bonus: The recipe is dairy FREE and uses minimal flour.

Our Chocolate Week here on West of Persia continues, ya’ll!

It’s pretty tough to improve upon quality chocolate’s velvety flavor. But lately I have been finding that a bit of cardamom in my Persian Hot Chocolate, or added into chocolate-based cookies, or even mixed into plain old melted chocolate tastes quite amazing.

The flavors of chocolate and cardamom play off of each other nicely in a way I can’t quite describe. They’re sort of like that couple you think of as mismatched who, when you spend time with them, all of a sudden seem perfect together. Harmonious in ways you never would’ve dreamed of. Hmmmm, perhaps we have a case of opposites attract on our hands here?

A closer view of this flavor explosion. Don't mind the mess. It's all good!

So much like the couple who meets in the most random of ways, I often find my recipes in the most random of places. Today’s recipe is adapted from the book Cook Yourself Thin Faster, by Lauren Deen. During the course of my travels around New York City, at some point I ran into a promotional postcard for this book that had this recipe featured on the back. It looked delicious, so I took a look at the ingredients and instructions and figured I’d could adapt it to my specifications. Then I stashed it at home and promptly forgot about it for about two seconds. 😉

I’m happy to report that on the first try, I was able to get rid of all of the dairy,  the granulated sugar, and even added in my own twist with cardamom, orange blossom water, almond extract, and a dusting of pepper. The result? An amazingly decadent cake. Ooey and gooey. Not something you’d ever associate with being on the healthier side. Stealth health, I like to call it. So here’s my adaptation:

Chocolate Volcano Cakes with a Middle Eastern Flair

Recipe adapted from Cook Yourself Thin Faster

Ingredients:

Cooking spray

Cocoa powder for dusting muffin tins

2 1/2 Tablespoons Earth Balance Natural Buttery Spread (soy free)

1/3 cup Agave nectar

2 Large eggs plus one egg white

1/3 Pastry flour (all purpose flour works too; pastry is what I had on hand)

6 ounces bittersweet chocolate in chips or cut into chunks

1 teaspoon cardamom powder

2 teaspoons orange blossom water

1 teaspoon almond extract

1 teaspoon vanilla extract

1/2 teaspoon of freshly ground peppercorn mix (optional)

1/2 teaspoon of Turkish coffee powder (optional)

For garnish: Confectioner’s sugar and/or decorative fruits and nuts of choice

Directions:

1. Preheat an oven to 400 degrees F.

2. Warm a non-reactive saucepan, using very low heat. Add the chocolate chunks and stir gently to encourage melting. This doesn’t take long, so don’t walk away. When chocolate is mostly smooth (a few chunks can remain), take it off of the heat, and put it into a bowl. Set aside.

3. Line 6 standard sized muffin tins with wrappers. Spray inside of muffin tins with cooking spray.  Dust with cocoa powder. Tap out excess cocoa powder and place tins on a baking sheet.

4. Using an electric mixer, cream the Earth Balance and the agave nectar until fluffy and smooth. This takes about a minute.

5. Add the eggs and egg white one at a time, beating the mixture well after each addition.

6. Lower the mixer speed to low, and slowly add in the flour, one-third of the mixture at a time. Beat until just combined. Add in the spices and extracts and beat again lightly to combine.

7. Spoon the batter evenly into the prepared muffin cups.

8. Bake just until the tops of the cakes no longer jiggle when you shake the pan lightly, 8 to 10 minutes. Remove from the oven, and remove from the baking sheet. Place on a cooking rack and let cool for 5 minutes.

9. Meanwhile, prepare any garnishes you might use.

10. To plate, carefully peel off the muffin wrappers and gently lower onto a plate. Mostly likely the cakes will crack or even bust open a bit. That’s good–the oozey stuff is the best part. Garnish as desired and enjoy!

Read Full Post »

Older Posts »